Android HTTP请求方式:HttpURLConnection
本节引言:
前面两节我们学习的都是一些概念性的东西,Http的协议以及协议头的一些东东,而本节我们 就要堆码了,而本节学习的是Android为我们提供的Http请求方式之一:HttpURLConnection, 除了这种,还有一种还有一种HttpClient,后者我们会下一节讲!不过前者一旦请求复杂起来,使用起来 非常麻烦,而后者我们Java抓包也经常会用到,是Apache的,毕竟不是谷歌亲儿子,而在4.4版本 HttpURLConnection已被替换成OkHttp了!好吧,与时俱进,决定讲完HttpClient也来会会这个 OkHttp!对了,一般我们实际开发并不会用HttpURLConnection和HttpClient,使用别人封装 好的第三方网络请求框架,诸如:Volley,android-async-http,loopj等,因为网络操作涉及到 异步以及多线程,自己动手撸的话,很麻烦,所以实际开发还是直接用第三方!!当然学习下也 无妨,毕竟第三方也是在这些基础上撸起来的,架构逼格高,各种优化!好的,话不多说,开始 本节内容!
1.HttpURLConnection的介绍
答:一种多用途、轻量极的HTTP客户端,使用它来进行HTTP操作可以适用于大多数的应用程序。 虽然HttpURLConnection的API提供的比较简单,但是同时这也使得我们可以更加容易地去使 用和扩展它。继承至URLConnection,抽象类,无法直接实例化对象。通过调用openCollection() 方法获得对象实例,默认是带gzip压缩的;
2.HttpURLConnection的使用步骤
使用HttpURLConnection的步骤如下:
- 创建一个URL对象: URL url = new URL(http://www.baidu.com);
- 调用URL对象的openConnection( )来获取HttpURLConnection对象实例: HttpURLConnection conn = (HttpURLConnection) url.openConnection();
- 设置HTTP请求使用的方法:GET或者POST,或者其他请求方式比如:PUT conn.setRequestMethod("GET");
- 设置连接超时,读取超时的毫秒数,以及服务器希望得到的一些消息头 conn.setConnectTimeout(6*1000);***conn.setReadTimeout(6 1000);
- 调用getInputStream()方法获得服务器返回的输入流,然后输入流进行读取了 InputStream in = conn.getInputStream();
- 最后调用disconnect()方法将HTTP连接关掉 conn.disconnect();
PS:除了上面这些外,有时我们还可能需要对响应码进行判断,比如200: if(conn.getResponseCode() != 200)然后一些处理 还有,可能有时我们 并不需要传递什么参数,而是直接去访问一个页面,我们可以直接用: final InputStream in = new URL("url").openStream(); 然后直接读流,不过这个方法适合于直接访问页面的情况,底层实现其实也是 return openConnection().getInputStream(),而且我们还不能设置一些 请求头的东东,所以要不要这样写,你自己要掂量掂量!
3.HttpURLConnection使用示例
这里我们主要针对GET和POST请求写两个不同的使用示例,我们可以conn.getInputStream() 获取到的是一个流,所以我们需要写一个类将流转化为二进制数组!工具类如下:
StreamTool.java:
/**
 * Created by Jay on 2015/9/7 0007.
 */
public class StreamTool {
    //从流中读取数据
    public static byte[] read(InputStream inStream) throws Exception{
        ByteArrayOutputStream outStream = new ByteArrayOutputStream();
        byte[] buffer = new byte[1024];
        int len = 0;
        while((len = inStream.read(buffer)) != -1)
        {
            outStream.write(buffer,0,len);
        }
        inStream.close();
        return outStream.toByteArray();
    }
}
接下来就可以开始撸我们的示例了!
1)HttpURLConnection发送GET请求代码示例
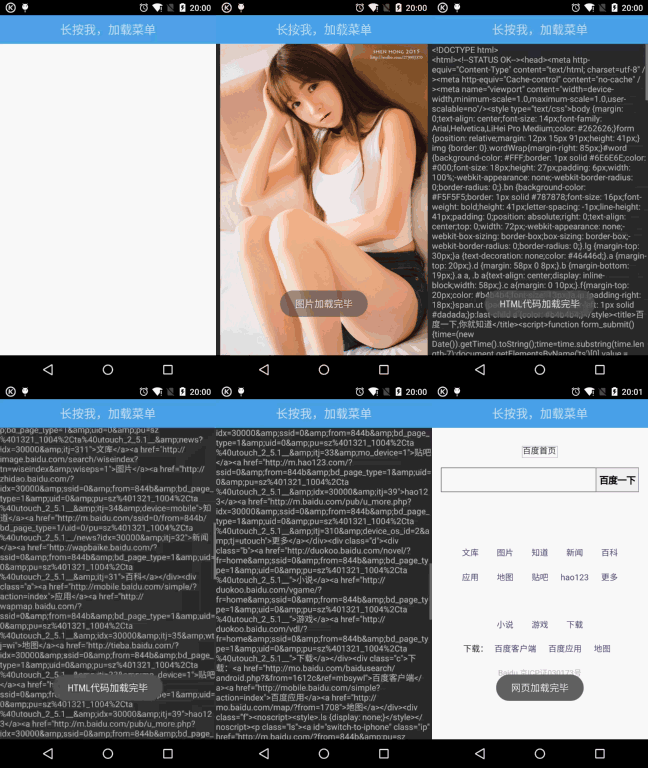
运行效果图:

核心部分代码:
布局:activity_main.xml
<LinearLayout xmlns:android="http://schemas.android.com/apk/res/android"
    android:layout_width="match_parent"
    android:layout_height="match_parent"
    android:orientation="vertical">

    <TextView
        android:id="@+id/txtMenu"
        android:layout_width="match_parent"
        android:layout_height="48dp"
        android:background="#4EA9E9"
        android:clickable="true"
        android:gravity="center"
        android:text="长按我,加载菜单"
        android:textSize="20sp" />

    <ImageView
        android:id="@+id/imgPic"
        android:layout_width="match_parent"
        android:layout_height="match_parent"
        android:visibility="gone" />

    <ScrollView
        android:id="@+id/scroll"
        android:layout_width="match_parent"
        android:layout_height="match_parent"
        android:visibility="gone">

        <TextView
            android:id="@+id/txtshow"
            android:layout_width="wrap_content"
            android:layout_height="wrap_content" />
    </ScrollView>

    <WebView
        android:id="@+id/webView"
        android:layout_width="match_parent"
        android:layout_height="match_parent" />

</LinearLayout>获取数据类:GetData.java:
/**
 * Created by Jay on 2015/9/7 0007.
 */
public class GetData {
    // 定义一个获取网络图片数据的方法:
    public static byte[] getImage(String path) throws Exception {
        URL url = new URL(path);
        HttpURLConnection conn = (HttpURLConnection) url.openConnection();
        // 设置连接超时为5秒
        conn.setConnectTimeout(5000);
        // 设置请求类型为Get类型
        conn.setRequestMethod("GET");
        // 判断请求Url是否成功
        if (conn.getResponseCode() != 200) {
            throw new RuntimeException("请求url失败");
        }
        InputStream inStream = conn.getInputStream();
        byte[] bt = StreamTool.read(inStream);
        inStream.close();
        return bt;
    }

    // 获取网页的html源代码
    public static String getHtml(String path) throws Exception {
        URL url = new URL(path);
        HttpURLConnection conn = (HttpURLConnection) url.openConnection();
        conn.setConnectTimeout(5000);
        conn.setRequestMethod("GET");
        if (conn.getResponseCode() == 200) {
            InputStream in = conn.getInputStream();
            byte[] data = StreamTool.read(in);
            String html = new String(data, "UTF-8");
            return html;
        }
        return null;
    }
}MainActivity.java:
public class MainActivity extends AppCompatActivity {

    private TextView txtMenu, txtshow;
    private ImageView imgPic;
    private WebView webView;
    private ScrollView scroll;
    private Bitmap bitmap;
    private String detail = "";
    private boolean flag = false;
    private final static String PIC_URL = "http://ww2.sinaimg.cn/large/7a8aed7bgw1evshgr5z3oj20hs0qo0vq.jpg";
    private final static String HTML_URL = "http://www.baidu.com";

    // 用于刷新界面
    private Handler handler = new Handler() {
        public void handleMessage(android.os.Message msg) {
            switch (msg.what) {
                case 0x001:
                    hideAllWidget();
                    imgPic.setVisibility(View.VISIBLE);
                    imgPic.setImageBitmap(bitmap);
                    Toast.makeText(MainActivity.this, "图片加载完毕", Toast.LENGTH_SHORT).show();
                    break;
                case 0x002:
                    hideAllWidget();
                    scroll.setVisibility(View.VISIBLE);
                    txtshow.setText(detail);
                    Toast.makeText(MainActivity.this, "HTML代码加载完毕", Toast.LENGTH_SHORT).show();
                    break;
                case 0x003:
                    hideAllWidget();
                    webView.setVisibility(View.VISIBLE);
                    webView.loadDataWithBaseURL("", detail, "text/html", "UTF-8", "");
                    Toast.makeText(MainActivity.this, "网页加载完毕", Toast.LENGTH_SHORT).show();
                    break;
                default:
                    break;
            }
        }

        ;
    };

    @Override
    protected void onCreate(Bundle savedInstanceState) {
        super.onCreate(savedInstanceState);
        setContentView(R.layout.activity_main);
        setViews();
    }

    private void setViews() {
        txtMenu = (TextView) findViewById(R.id.txtMenu);
        txtshow = (TextView) findViewById(R.id.txtshow);
        imgPic = (ImageView) findViewById(R.id.imgPic);
        webView = (WebView) findViewById(R.id.webView);
        scroll = (ScrollView) findViewById(R.id.scroll);
        registerForContextMenu(txtMenu);
    }

    // 定义一个隐藏所有控件的方法:
    private void hideAllWidget() {
        imgPic.setVisibility(View.GONE);
        scroll.setVisibility(View.GONE);
        webView.setVisibility(View.GONE);
    }

    @Override
    // 重写上下文菜单的创建方法
    public void onCreateContextMenu(ContextMenu menu, View v, ContextMenu.ContextMenuInfo menuInfo) {
        MenuInflater inflator = new MenuInflater(this);
        inflator.inflate(R.menu.menus, menu);
        super.onCreateContextMenu(menu, v, menuInfo);
    }

    // 上下文菜单被点击是触发该方法
    @Override
    public boolean onContextItemSelected(MenuItem item) {
        switch (item.getItemId()) {
            case R.id.one:
                new Thread() {
                    public void run() {
                        try {
                            byte[] data = GetData.getImage(PIC_URL);
                            bitmap = BitmapFactory.decodeByteArray(data, 0, data.length);
                        } catch (Exception e) {
                            e.printStackTrace();
                        }
                        handler.sendEmptyMessage(0x001);
                    }

                    ;
                }.start();
                break;
            case R.id.two:
                new Thread() {
                    public void run() {
                        try {
                            detail = GetData.getHtml(HTML_URL);
                        } catch (Exception e) {
                            e.printStackTrace();
                        }
                        handler.sendEmptyMessage(0x002);
                    };
                }.start();
                break;
            case R.id.three:
                if (detail.equals("")) {
                    Toast.makeText(MainActivity.this, "先请求HTML先嘛~", Toast.LENGTH_SHORT).show();
                } else {
                    handler.sendEmptyMessage(0x003);
                }
                break;
        }
        return true;
    }
}注意事项:
用handler的原因就不用讲了吧~ 另外我们加载html代码的使用的是webView的loadDataWithBaseURL而非LoadData, 如果用LoadData又要去纠结中文乱码的问题,so…用loadDataWithBaseURL就可以不用纠结那么多了 另外有些页面可能需要我们提交一些参数,比如账号密码:我们只需把对应参数拼接到url尾部即可,比如: http://192.168.191.1:8080/ComentServer/LoginServlet?passwd=123&name=Jack 然后服务端getParamater("passwd")这样就可以获得相应的参数了,我们请求时这些东西都会看得清清楚楚 ,所以说GET方式并不安全!另外还有一点要注意的就是Android从4.0开始就不允许在非UI线程中进行UI操作!
2)HttpURLConnection发送POST请求代码示例
有GET自然有POST,我们通过openConnection获取到的HttpURLConnection默认是进行Get请求的, 所以我们使用POST提交数据,应提前设置好相关的参数:conn.setRequestMethod("POST"); 还有:conn.setDoOutput(true);conn.setDoInput(true);设置允许输入,输出 还有:conn.setUseCaches(false); POST方法不能缓存,要手动设置为false, 具体实现看代码:
运行效果图:

核心代码:
PostUtils.java
public class PostUtils {
    public static String LOGIN_URL = "http://172.16.2.54:8080/HttpTest/ServletForPost";
    public static String LoginByPost(String number,String passwd)
    {
        String msg = "";
        try{
            HttpURLConnection conn = (HttpURLConnection) new URL(LOGIN_URL).openConnection();
            //设置请求方式,请求超时信息
            conn.setRequestMethod("POST");
            conn.setReadTimeout(5000);
            conn.setConnectTimeout(5000);
            //设置运行输入,输出:
            conn.setDoOutput(true);
            conn.setDoInput(true);
            //Post方式不能缓存,需手动设置为false
            conn.setUseCaches(false);
            //我们请求的数据:
            String data = "passwd="+ URLEncoder.encode(passwd, "UTF-8")+
                    "&number="+ URLEncoder.encode(number, "UTF-8");
            //这里可以写一些请求头的东东...
            //获取输出流
            OutputStream out = conn.getOutputStream();
            out.write(data.getBytes());
            out.flush();
             if (conn.getResponseCode() == 200) {
                    // 获取响应的输入流对象
                    InputStream is = conn.getInputStream();
                    // 创建字节输出流对象
                    ByteArrayOutputStream message = new ByteArrayOutputStream();
                    // 定义读取的长度
                    int len = 0;
                    // 定义缓冲区
                    byte buffer[] = new byte[1024];
                    // 按照缓冲区的大小,循环读取
                    while ((len = is.read(buffer)) != -1) {
                        // 根据读取的长度写入到os对象中
                        message.write(buffer, 0, len);
                    }
                    // 释放资源
                    is.close();
                    message.close();
                    // 返回字符串
                    msg = new String(message.toByteArray());
                    return msg;
             }
        }catch(Exception e){e.printStackTrace();}
        return msg;
    }
}
PS:因为电脑没装MyEclipse,而且时间关系,就不另外写demo了,用回之前的Eclipse的那个demo! 其实从直接看核心代码就够了~ 代码下载:HttpURLConnection例子.zip
4.Cookie问题的处理
说这个之前,首先我们要理解两个概念:Session和Cookie Cookie只是Session机制的一种常用形式,我们也可以使用其他方式来作为客户端的一个唯一标识, 这个由服务器决定,唯一能够证明一个客户端标识就好!除了这种方式外,我们还可以使用URL重写! 方法来实现!所以以后别傻傻的跟别人说:Session不就是Cookie!
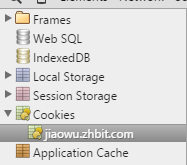
下面通过一个例子来帮助大家理解这个Cookie: 小猪输入账号密码后登陆下学校的教务系统,然后访问课表信息成功, 然后如果你用的是Chrome,按F12进入开发模式:来到Resources界面可以看到我们的Cookies:

 免费 AI IDE


更多建议: